Chapter 5: The Architecture
IN BRIEF · The instrument is a decision procedure: Part A classifies, Part B decides conduct, Parts C and D feed the identification in, and Parts E and F are administrative. Part B splits by visibility state: Section I always applies, Section II only between vessels in sight, and Section III (Rule 19) in restricted visibility. The first question in any encounter is whether you are in sight of the other vessel, because it decides which rules you are allowed to apply.
A set of rules drafted for use under pressure cannot be arranged for the convenience of its drafters. It has to be arranged for the convenience of the watchkeeper who reaches for it with a contact closing and seconds to decide. The COLREGs are arranged that way. The order of the Parts, the placement of the definitions, and above all the split of the steering and sailing rules by state of visibility are not editorial choices. They follow the sequence in which an OOW actually works through a situation. This chapter is about reading the layout as a decision procedure. Once you can see the structure, you can place any rule by its number alone, and you can find the governing rule under pressure without hunting for it.
The current instrument is built of six Parts, lettered A to F, containing forty-one rules, followed by four Annexes (MISCPUB 0127). That count itself carries a piece of history. BR45’s own layout table, written in 2016, still shows five Parts and thirty-eight rules (BR45 Vol 4, para 1005, Table 10-1), because Part F was added later, by the 2013 amendments discussed in Chapter 2. The framework, though, is exactly as BR45 sets it out, and it is worth taking Part by Part.
Conduct before signals
The first thing the order tells you is what to reach for first. Before the 1972 rewrite the instrument led with lights, shapes and sound signals, and put the steering and sailing rules after them. The 1972 Convention reversed that, so that the Rules governing conduct now come first and the technical signalling provisions follow (Cockcroft & Lameijer, 7th ed, History of the Collision Regulations; and see Chapter 2). The reasoning is purely practical. The steering and sailing rules are what you apply in the moment of decision. The lights and signals are how you gather the information to apply them. Putting conduct first is the drafters telling you where the live decision is made. Everything after Part B is, in a sense, in service of Part B.
Part A: the first check
Part A, Rules 1 to 3, is General, and it does the work that has to be done before any conduct rule can engage. Rule 1, application, fixes where and to whom the Rules apply, which Chapter 3 covered. Rule 2, responsibility, holds every vessel to the ordinary practice of seamen and is treated in full in Chapter 10. The rule that makes Part A structurally first, though, is Rule 3, definitions, and it is worth understanding why it sits at the front.
Rule 3 works like a set of switches. Almost every conduct rule downstream is written to apply only to a particular kind of vessel in a particular state: a vessel “underway,” a vessel “in sight” of another, a vessel in “restricted visibility,” one “not under command” or “restricted in her ability to manoeuvre” or “constrained by her draught.” Until you have classified the situation against those definitions, you do not yet know which rules apply. So the drafters put the classifications before the conduct. This is the same logic that makes a flowchart begin with a question rather than an instruction. Rule 3 is not preamble to be skimmed on the way to the interesting rules. It is the check every other rule has to pass through.
PRACTICAL NOTE: definitions decide the rule, not just the wording
When a situation feels ambiguous, the ambiguity is very often in the classification, not in the conduct rule. Is the other vessel actually “in sight,” or are you holding her on radar in reduced visibility? Is she “underway,” or stopped and therefore still underway but not making way, or actually at anchor? The answer changes which Part of the instrument governs. Resolve the Rule 3 question first, and the right conduct rule usually selects itself.
Part B: the core of the whole instrument
Part B, the steering and sailing rules, is where collisions are avoided. It is split into three sections that an OOW must hold separate in the mind at all times. Each applies in different circumstances, and applying the wrong one is itself a way to cause a collision (BR45 Vol 4, para 1006a). This visibility-state structure is the single most important thing in the layout to learn, so it is worth being slow and exact about it.
Section I, Rules 4 to 10, is the conduct of vessels in any condition of visibility. Look-out, safe speed, risk of collision, action to avoid collision, narrow channels and traffic separation: these obligations run continuously and never switch off, whatever the visibility, and whether or not you can see the other vessel. BR45 makes a point about Section I that is easy to miss and structurally vital. These rules qualify the more specific rules in the other two sections rather than merely sitting beside them (BR45 Vol 4, para 1005, Table 10-1). Safe speed and proper look-out are not an alternative to the encounter rules. They are conditions on everything you do under them.
Section II, Rules 11 to 18, is the conduct of vessels in sight of one another. This is where the whole familiar world of give-way and stand-on lives: sailing vessels, overtaking, head-on, crossing, the action required of the give-way vessel and of the stand-on vessel, and the responsibilities between different classes of vessel. Every one of these rules carries an unstated precondition, stated once for all of them in Rule 11: the vessels must be in sight of one another. If they are not, none of Section II applies.
Section III is a single rule, Rule 19, the conduct of vessels in restricted visibility. It governs when vessels are not in sight of one another and are navigating in or near an area of restricted visibility.
The decisive question that routes you through this whole structure is therefore a single one. Are the two vessels in sight of one another, or not? That one fact sends you into Section II or into Rule 19, and the two produce fundamentally different obligations. It is the first question to answer in any developing encounter, because it decides which rules you are even allowed to apply.
PRACTICAL NOTE: there is no stand-on vessel in fog
The most dangerous structural error an OOW can make is to import Section II into a Section III situation. In restricted visibility, with the other vessel detected only by radar and not visually in sight, Rules 11 to 18 do not apply at all (BR45 Vol 4, para 1006a). There is no give-way vessel and no stand-on vessel, and no right to hold course and speed, because those concepts belong to Section II and Section II is switched off. A watchkeeper who sees a radar contact in fog and begins reasoning “this is a crossing situation, I am the stand-on vessel” has applied rules that do not govern, and is now acting on a script the other bridge is not reading. Rule 19 alone governs, and it asks something different. The fuller treatment is in Chapter 8 and at Rule 19 in Part II. The architectural point here is simply that the visibility state decides the section, and the section decides the Rules.
The three sections are not completely separate, though, and two qualifications keep the picture accurate. The first is that some rules deliberately cut across the sections. Rule 13, overtaking, overrides everything in Sections I and II, so that a vessel overtaking stays the give-way vessel regardless of any later change in the geometry. But Rule 13 does not reach into restricted visibility, where Rule 19 is paramount (BR45 Vol 4, para 1006a). The second is that more than one rule is usually in play at once. The give-way vessel in a crossing situation is not applying Rule 15 alone. She is applying Rule 15 to identify her role, Rule 16 for the action she must take, and Rule 8 for how that action is to be carried out, with Section I running underneath all of it (BR45 Vol 4, para 1006b). The structure tells you which rules are candidates. It does not relieve you of reading all the ones that apply. This is the reasoning behind the design decision, set out in Chapter 1 and carried through Part II, that the interaction of the Rules is first-class content rather than a footnote.
Parts C and D: how you read the other vessel
Parts C and D are often treated by candidates as a separate, dreary subject to be memorised on its own, and the structure argues against that. Part C, lights and shapes, Rules 20 to 31, exists to indicate a vessel’s movement, her angle on the bow, and her category (BR45 Vol 4, para 1005, Table 10-1). Part D, sound and light signals, Rules 32 to 37, provides the signals to draw attention, to indicate a manoeuvre, and to be used in restricted visibility. Read structurally, these two Parts are the input side of Part B. They are how you answer the Rule 3 classification questions and read the aspect of the other vessel. A particular arrangement of lights tells you she is a power-driven vessel underway, or a vessel not under command, or a vessel restricted in her ability to manoeuvre, and which way she is heading. The conduct rules in Part B then act on that answer. Lights and signals are not a topic standing apart from collision avoidance. They are the means by which the encounter rules receive their facts. This is why the guide treats them in detail, with their own tables and diagrams, when it reaches Part II, and why getting them to recognition speed matters. They are the sensors feeding the decision.
Parts E and F, and the Annexes
The tail of the instrument is administrative, and an OOW should know what it is in order to know what it is not. Part E, Rule 38, exemptions, is mainly the concern of shipowners and builders. It sets out transitional relief for older vessels from certain lights and equipment requirements (BR45 Vol 4, para 1005, Table 10-1). Part F, Rules 39 to 41, verification of compliance, was added by the 2013 amendments. It deals with the survey and audit machinery by which flag states show that they are giving effect to the Convention (MISCPUB 0127, Part F). It is a matter for administrations, not for the bridge, and an OOW will almost never apply it. Knowing that Parts E and F are non-operational is itself useful, because it tells you that the live content of the instrument ends with Part D.
The four Annexes carry the technical detail deliberately moved out of the Rules in 1972 so that it could be updated without amending treaty text. Annex I specifies the positioning and technical particulars of lights and shapes. Annex II covers the additional signals for vessels fishing in close proximity. Annex III sets the technical specification of sound signal appliances. Annex IV lists the distress signals. For practical purposes the two an OOW must know well are Annex II and Annex IV, the latter read together with Rule 37, while a working awareness of Annexes I and III is enough (BR45 Vol 4, para 1005b).
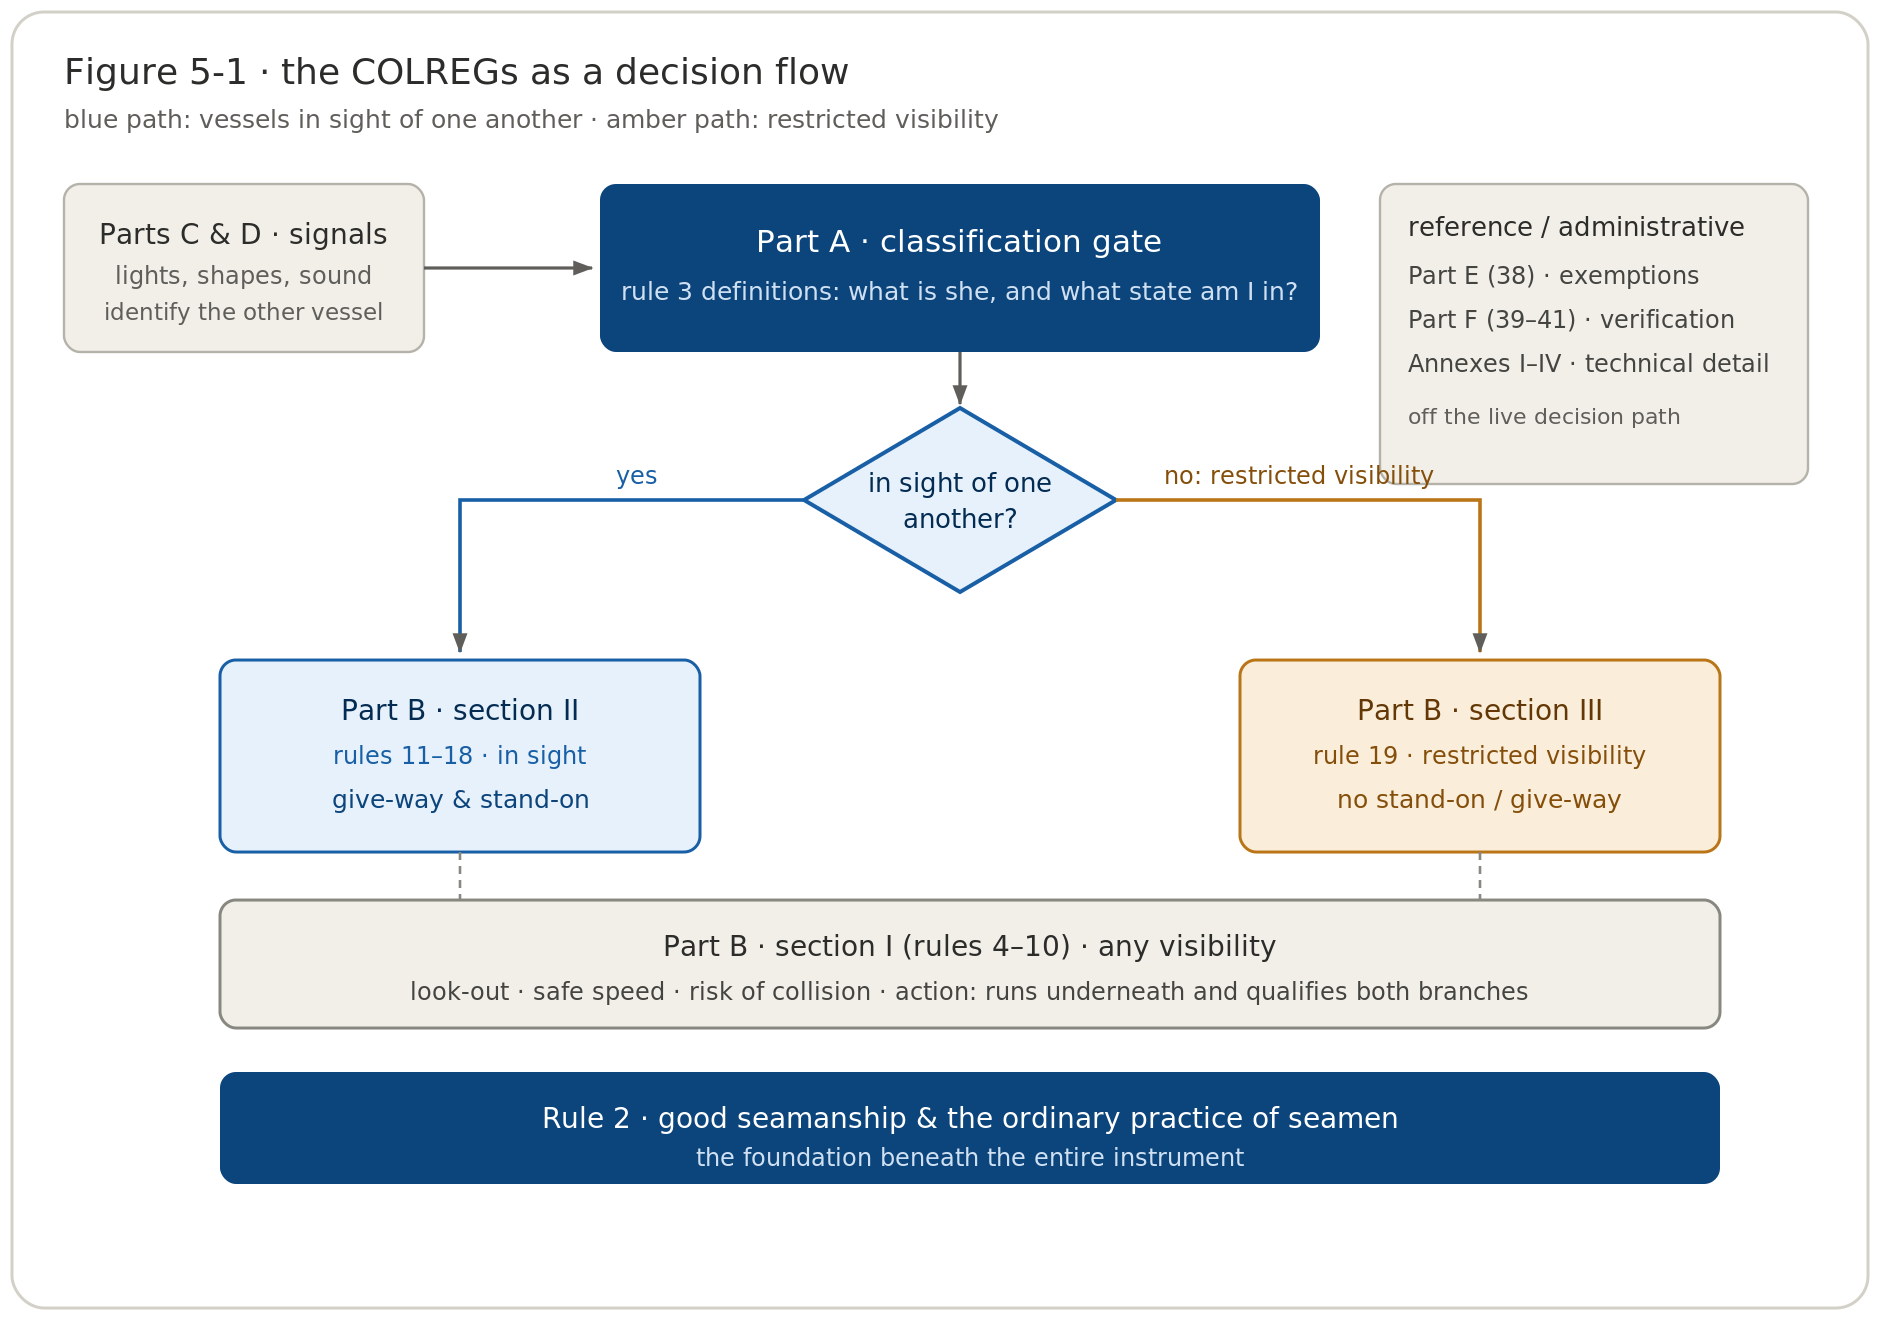
Figure 5-1. One-page structure map of the COLREGs, drawn as a decision flow rather than a contents list. The eye traces the same path the OOW’s decision takes: classify at the Part A check, then ask the visibility question, then read the governing section, with Section I qualifying both branches, Parts C and D feeding identification in, and Rule 2 as the foundation beneath the whole.
A short worked case: the same two ships, twice
Take two power-driven vessels on steady crossing bearings, one fine on the other’s starboard bow, risk of collision developing. In clear weather, in sight of one another, the architecture routes the encounter into Section II. This is a crossing situation under Rule 15. The vessel with the other on her starboard side is the give-way vessel, the other is the stand-on vessel, and Rules 16, 17 and 8 fill in what each must do. Now run the identical geometry in thick fog, the contact held only on radar. Nothing about the closing has changed, but the visibility state has, and the architecture now routes the same encounter into Section III. Rule 19 governs. There is no stand-on vessel and no give-way vessel. The obligations on each ship are different, and neither may assume the other will behave as a Section II crossing would have her behave. One geometry, two entirely different sets of rules, selected by nothing more than whether the ships can see each other. That is the architecture doing its job, and it is why the structure has to be learned before the Rules that sit inside it.
See also: Ch 2 (the 1972 format reversal and the addition of Part F), Ch 3 (Rule 1, application), Ch 7 (the Rule 3 definitions in full), Ch 8 (how the visibility-state routing plays out dynamically as a situation develops), Ch 10 (Rule 2 as the foundation beneath the whole structure).